MVC
MVC是模型(Model), 视图(View), 控制器(Controller)的简写, 是一种软件设计规范, 是将业务逻辑, 数据, 显示分离的方法来组织代码.
主要作用是降低 降低视图与业务逻辑间的双向耦合
MVC不是一种设计模式, MVC是一种架构模式
回顾Servlet
新建Maven项目, 导入依赖
1
2
3
4
5
6
7
8
9
10
11
12
13
14
15
16
17
18
19
20
21
22
23
24
25
26
27
28
29
30
31
32
33
34
35
36
37
38<dependencies>
<dependency>
<groupId>junit</groupId>
<artifactId>junit</artifactId>
<version>4.12</version>
<scope>test</scope>
</dependency>
<!-- https://mvnrepository.com/artifact/org.springframework/spring-webmvc -->
<dependency>
<groupId>org.springframework</groupId>
<artifactId>spring-webmvc</artifactId>
<version>5.2.7.RELEASE</version>
</dependency>
<!-- https://mvnrepository.com/artifact/javax.servlet/javax.servlet-api -->
<dependency>
<groupId>javax.servlet</groupId>
<artifactId>javax.servlet-api</artifactId>
<version>4.0.1</version>
<scope>provided</scope>
</dependency>
<!-- https://mvnrepository.com/artifact/javax.servlet.jsp/jsp-api -->
<dependency>
<groupId>javax.servlet.jsp</groupId>
<artifactId>jsp-api</artifactId>
<version>2.2</version>
<scope>provided</scope>
</dependency>
<!-- https://mvnrepository.com/artifact/javax.servlet/jstl -->
<dependency>
<groupId>javax.servlet</groupId>
<artifactId>jstl</artifactId>
<version>1.2</version>
</dependency>
</dependencies>编写Servlet方法
1
2
3
4
5
6
7
8
9
10
11
12
13
14
15
16
17
18
19
20
21
22
23
public class HelloServlet extends HttpServlet {
protected void doGet(HttpServletRequest req, HttpServletResponse resp) throws ServletException, IOException {
//1. 获取前端参数
String method = req.getParameter("method");
if (method.equals("add")) {
req.getSession().setAttribute("msg", "执行了add方法");
}
if (method.equals("delete")) {
req.getSession().setAttribute("msg", "执行了delete方法");
}
//2. 调用业务层
//3. 视图转发或重定向
req.getRequestDispatcher("/WEB-INF/jsp/test.jsp").forward(req, resp);
}
protected void doPost(HttpServletRequest req, HttpServletResponse resp) throws ServletException, IOException {
doGet(req, resp);
}
}在web.xml中进行页面的绑定
1
2
3
4
5
6
7
8
9
10
11
12
13
14
15
16
<web-app xmlns="http://xmlns.jcp.org/xml/ns/javaee"
xmlns:xsi="http://www.w3.org/2001/XMLSchema-instance"
xsi:schemaLocation="http://xmlns.jcp.org/xml/ns/javaee http://xmlns.jcp.org/xml/ns/javaee/web-app_4_0.xsd"
version="4.0">
<servlet>
<servlet-name>HelloServlet</servlet-name>
<servlet-class>com.lxb.servlet.HelloServlet</servlet-class>
</servlet>
<servlet-mapping>
<servlet-name>HelloServlet</servlet-name>
<url-pattern>/helloServlet</url-pattern>
</servlet-mapping>
</web-app>
HelloSpringMVC
创建一个Maven项目, 确定依赖和包都正确导入


新建一个.jsp页面

在web.xml中配置DispatcherServlet, 这是SpringMVC的核心!
作为请求分发器, 或前端控制器
1
2
3
4
5
6
7
8
9
10
11
12
13
14
15
16
17
18
19
20
21
22
23
24
<web-app xmlns="http://xmlns.jcp.org/xml/ns/javaee"
xmlns:xsi="http://www.w3.org/2001/XMLSchema-instance"
xsi:schemaLocation="http://xmlns.jcp.org/xml/ns/javaee http://xmlns.jcp.org/xml/ns/javaee/web-app_4_0.xsd"
version="4.0">
<servlet>
<servlet-name>springmvc</servlet-name>
<servlet-class>org.springframework.web.servlet.DispatcherServlet</servlet-class>
<!-- DispatcherServlet要绑定Spring的配置文件-->
<init-param>
<param-name>contextConfigLocation</param-name>
<param-value>classpath:springmvc-servlet.xml</param-value>
</init-param>
<!-- 启动级别-->
<load-on-startup>1</load-on-startup>
</servlet>
<servlet-mapping>
<servlet-name>springmvc</servlet-name>
<url-pattern>/</url-pattern>
</servlet-mapping>
</web-app>这里的地址写的是
/, 而不是/*/: 只匹配所有的请求, 不会去匹配jsp页面
/*: 匹配所有的请求, 包括jsp页面
写Spring配置文件
1
2
3
4
5
6
7
8
9
10
11
12
13
14
<beans xmlns="http://www.springframework.org/schema/beans"
xmlns:xsi="http://www.w3.org/2001/XMLSchema-instance"
xsi:schemaLocation="http://www.springframework.org/schema/beans http://www.springframework.org/schema/beans/spring-beans.xsd">
<bean class="org.springframework.web.servlet.handler.BeanNameUrlHandlerMapping"/>
<bean class="org.springframework.web.servlet.mvc.SimpleControllerHandlerAdapter"/>
<bean class="org.springframework.web.servlet.view.InternalResourceViewResolver" id="InternalResourceViewResolver">
<property name="prefix" value="WEB-INF/jsp/"/>
<property name="suffix" value=".jsp"/>
</bean>
<bean id="/hello" class="com.lxb.controller.HelloController"/>
</beans>第一个bean是 处理器映射器
第二个bean是 处理器适配器
第三个bean是 视图解析器
视图解析器中第一个属性为 前缀
第二个属性为 后缀
编写Controller代码
1
2
3
4
5
6
7
8
9
10
11
12
13
14
15
16
public class HelloController implements Controller {
public ModelAndView handleRequest(HttpServletRequest httpServletRequest, HttpServletResponse httpServletResponse) throws Exception {
ModelAndView mv = new ModelAndView();
// 业务代码
String result = "HelloSpringMVC";
mv.addObject("msg", result);
// 视图跳转
mv.setViewName("test");
return mv;
}
}
使用注解开发
写依赖, 导包
写web.xml
1
2
3
4
5
6
7
8
9
10
11
12
13
14
15
16
17
18
19
20
21
22
23
<web-app xmlns="http://xmlns.jcp.org/xml/ns/javaee"
xmlns:xsi="http://www.w3.org/2001/XMLSchema-instance"
xsi:schemaLocation="http://xmlns.jcp.org/xml/ns/javaee http://xmlns.jcp.org/xml/ns/javaee/web-app_4_0.xsd"
version="4.0">
<servlet>
<servlet-name>springmvc</servlet-name>
<servlet-class>org.springframework.web.servlet.DispatcherServlet</servlet-class>
<!-- DispatcherServlet要绑定Spring的配置文件-->
<init-param>
<param-name>contextConfigLocation</param-name>
<param-value>classpath:springmvc-servlet.xml</param-value>
</init-param>
<!-- 启动级别-->
<load-on-startup>1</load-on-startup>
</servlet>
<servlet-mapping>
<servlet-name>springmvc</servlet-name>
<url-pattern>/</url-pattern>
</servlet-mapping>
</web-app>写Spring配置文件
注意引入的约束, 这些都是写死的
1
2
3
4
5
6
7
8
9
10
11
12
13
14
15
16
17
<?xml version="1.0" encoding="UTF-8"?>
<beans xmlns="http://www.springframework.org/schema/beans"
xmlns:xsi="http://www.w3.org/2001/XMLSchema-instance"
xmlns:contex="http://www.springframework.org/schema/context"
xmlns:mvc="http://www.springframework.org/schema/mvc"
xsi:schemaLocation="http://www.springframework.org/schema/beans http://www.springframework.org/schema/beans/spring-beans.xsd http://www.springframework.org/schema/context https://www.springframework.org/schema/context/spring-context.xsd http://www.springframework.org/schema/mvc https://www.springframework.org/schema/mvc/spring-mvc.xsd">
<contex:component-scan base-package="com.lxb.controller"/>
<mvc:default-servlet-handler/>
<mvc:annotation-driven/>
<bean id="InternalResourceViewResolver" class="org.springframework.web.servlet.view.InternalResourceViewResolver">
<property name="prefix" value="/WEB-INF/jsp/"/>
<property name="suffix" value=".jsp"/>
</bean>
</beans>写业务控制器代码
1
2
3
4
5
6
7
8
9
10
11
public class HelloController {
// 真实访问地址
("/hello")
public String hello(Model model){
// 封装数据, 向模型中添加属性msg值, 可以在jsp页面中取出并渲染
model.addAttribute("msg", "Hello, springMVCAnnotation");
// 对应的jsp文件名
return "hello";
}
}就这么简单, 一个方法就对应了一个Servlet.
总结:
使用SpringMVC必须配置的三大件:
处理器映射器, 处理器适配器, 视图解析器
前两项被
<mvc:annotation-driven/>干掉了, 只需要手动配置一个视图解析器就好, 而且是固定的
Controller
如果是实现接口, 这个类会处理请求, 并返回一个ModelAndView类
如果使用注解, 代表这个类会被Spring接管, 被这个注解的类, 所有的方法, 如果返回值是String, 并且有具体页面可以跳转, 那么就会被视图解析器解析.
RequestMapping
1 |
|
@RequestMapping可以声明在类上, 也可以声明在方法上, 如果声明在类上, 如上述代码所示, 则真实的访问地址为:
http://localhost:8080/c2/t1
RestFull风格
对于如下代码:
1 |
|
如果直接访问http://localhost:8080/add是错误的页面, 需要填写地址为http://localhost:8080/add?a=1&b=2
以上原来的方式, 下面是用RestFull风格
修改代码为:
1 |
|
加入两个注解之后, 直接把需要查询的数字写在地址里即可, 访问地址为http://localhost:8080/add/1/2
可以限定访问的方法:
1 | (value = "/add/{a}/{b}", method = RequestMethod.GET) |
这样只能通过Get方法访问
或者直接使用以下注解:
1 | ("/add/{a}/{b}") |
每种方法都对应了一个Mapping
重定向和转发
无需视图解析器(不推荐)
转发
在Spring配置文件中, 把视图解析器注释掉
修改
return的地址1
2
3
4
5
6("/m1/t1")
public String test(HttpServletRequest request, HttpServletResponse response){
HttpSession session = request.getSession();
System.out.println(session.getId());
return "/WEB-INF/jsp/test.jsp";
}其实视图解析器就是处理了一下这个地址字符串
这就实现了转发功能
方式二:
1 | ("/m1/t1") |
重定向
把关键字forward 变成 redirect 即可
使用视图解析器
1 |
|
视图解析器检测到redirect 关键字后, 就不会加前缀和后缀
数据处理
从前端获取数据
提交的域名称和处理方法的参数名一致
提交数据: http://localhost:8080/user/t1?name=lxb
处理方法:
1 | //localhost:8080/user/t1?name=xxx |
一致情况下, 直接拿来用. 后台输出为:
接收到前端的参数为: lxb
提交的域名称和处理方法的参数名不一致
提交数据: http://localhost:8080/user/t1?username=lxb
处理方法:
1 | //localhost:8080/user/t1?username=xxx |
无论是否一致, 都推荐使用这种方式, 提醒自己这是从前端接收的数据, 而且如果域名城不是username的话浏览器会报错
前端接收的是一个对象
- 接收前端用户传递的参数, 判断参数的名字, 假设名字在方法上, 可以直接使用
- 假设传递的是一个对象, 匹配User对象字段名, 如果一致, 则OK, 有一个不一致就不能成功匹配
提交数据: http://localhost:8080/user/t2?id=1&name=lxb&age=23
处理方法:
1 | //前端接收的是一个对象: id, name, age |
输出:
User(id=1, name=lxb, age=23)
数据显示到前端
通过ModelAndView
略
通过ModelMap
ModelMap又继承了LinkedHashMap
通过Model
相当于ModelMap精简版
大多数情况下都使用Model
乱码问题
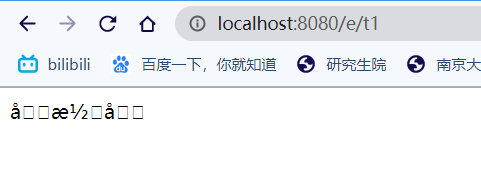
从前端获取中文字符
编写一个jsp页面传递一个中文字符
1
2
3
4<form action="/e/t1" method="post">
<input type="text" name="name">
<input type="submit">
</form>处理程序
1
2
3
4
5
6
7
8
9
public class EncodingController {
("/e/t1")
public String test1(String name, Model model){
System.out.println(name);
model.addAttribute("msg", name);
return "test";
}
}输出:

查看后台输出发现:

说明从前台获取后就是乱码
过滤器解决乱码
SpringMVC提供了过滤器, 直接在web.xml中配置即可
1 | <filter> |
SpringMVC拦截器
类似于Servlet开发中的过滤器Filter, 用于对处理器进行预处理和后处理, 可以自定义一些拦截器来实现特定的功能.
*过滤器与拦截器的区别: * 拦截器是AOP思想的具体应用
*过滤器: *
- servlet规范中的一部分, 任何java web工程都可以使用
- 在url-pattern中配置了/*之后, 可以对所有要访问的资源进行拦截
*拦截器: *
- 拦截器是SpringMVC框架自己的, 只有使用了SpringMVC框架的工程才能使用
- 拦截器只会拦截访问的控制器方法, 如果访问的是jsp/html/css/image/js是不会进行拦截的
自定义拦截器
必须实现HandlerInterceptor接口
实现接口
1
2
3
4
5
6
7
8
9
10
11
12
13
14
15
16
17
18
19
20
21public class MyInterceptor implements HandlerInterceptor {
// return true: 执行下一个拦截器, 放行
// return false: 不执行下一个拦截器
public boolean preHandle(HttpServletRequest request, HttpServletResponse response, Object handler) throws Exception {
System.out.println("=====处理前=====");
return true;
}
public void postHandle(HttpServletRequest request, HttpServletResponse response, Object handler, ModelAndView modelAndView) throws Exception {
System.out.println("=====处理后=====");
}
public void afterCompletion(HttpServletRequest request, HttpServletResponse response, Object handler, Exception ex) throws Exception {
System.out.println("=====清理=====");
}
}配置拦截器
1
2
3
4
5
6<mvc:interceptors>
<mvc:interceptor>
<mvc:mapping path="/**"/>
<bean class="com.lxb.config.MyInterceptor"/>
</mvc:interceptor>
</mvc:interceptors>执行结果:
1
2
3
4=====处理前=====
TestController ==> test()执行了
=====处理后=====
=====处理后=====
一般后两个方法是用来写日志的, 没有返回值, 真正起拦截作用的是第一个函数

